Smooth, polished edges not only make your leather goods look better but also improve their durability.
It’s that professional finish that turns a good project into a standout piece.
But where do you start? How do you achieve those flawless edges that catch the eye?
As a leatherworker, I’ve discovered the magic of burnishing firsthand. When I first started, my leather edges were rough and unrefined, which decreased the quality of my work.
But once I learned how to properly burnish those edges, everything changed.
In this guide, we’ll walk through everything you need to know about burnishing the edges.
Preparing The Edges
This might seem like a small detail, but trust me, it makes a world of difference in the final look of your project.
Trim the edges of your leather piece using a sharp knife or edge cutter. Sand and smooth the edges to remove rough spots and ensure a uniform surface.
Bevel the edges for a sleek finish that’s easier to burnish. Lightly dampen the edges with water to prepare them for the burnishing process.
If you’re new to using an edge beveler, it might feel tricky at first. Keep practicing, the more you use it, the more comfortable you’ll get.
How to Burnish Leather Edges?
Whether using your hands or a machine, burnishing is all about turning those rough, raw edges into smooth, polished perfection. Here’s how you can do it both ways.
1. Burnishing by Hand
When I started leatherworking, I didn’t have all the fancy tools, so I learned to burnish by hand.
Start by dampening the leather edge slightly. You can use water, but I’ve found that gum tragacanth or even saddle soap works wonders.
Next, grab your burnishing tool. If you don’t have a burnisher, a smooth piece of wood or even the handle of a spoon can work.
Begin rubbing the tool back and forth along the edge with firm, even pressure. You’ll notice the edge starting to darken and smooth out. Keep going until it feels smooth to the touch.
For an extra polished look, I like to finish with beeswax. This not only looks great but also protects the edge.
When I first saw the results of hand burnishing, I was amazed. The edges were smooth, shiny, and professional-looking.
2. Burnishing with a Machine
As I got more into leatherworking, I invested in a burnishing machine. It’s a game-changer, especially for larger projects or when you need to save time. Here’s how to use one:
Set up your burnishing machine according to the manufacturer’s instructions. These machines usually come with different attachments for various thicknesses of leather.
Just like with hand burnishing, start by moistening the edge. Again, gum tragacanth or saddle soap works great.
Turn on the machine and gently press the leather edge against the spinning burnisher. Move the leather back and forth to ensure even burnishing.
Finish with beeswax and use the machine to buff the edge. The machine gets it done quickly and efficiently, the results are as impressive as hand burnishing.
The first time I used a burnishing machine, I was blown away by how fast and easy it was.
Advanced Burnishing Techniques
Here are some advanced burnishing techniques:
Multi-Stage Burnishing: Applying multiple layers of burnishing agent and buffing between each layer to achieve a high-gloss finish.
Decorative Edges: Combining burnishing agents with color dyes to create customized and visually striking edges.
Motorized Burnishers: Utilizing machines with rotating wheels or rollers to apply consistent pressure and polish to edges.
Burnishing Blocks: Use wooden or acrylic blocks to compress and polish edges evenly, ensuring a smooth and uniform finish.
Heat-Assisted Burnishing: Use tools like heated burnishers or household irons on low settings to soften leather fibers, allowing burnishing agents to penetrate deeply for a durable, glossy edge finish.
Source: Corter Leather YT Channel
What Leather and Products Are Best for Burnishing?
The best leather for burnishing is vegetable-tanned leather due to its firmness and ability to hold shape.
Products like leather belts, wallets, and small accessories benefit most from burnishing to enhance their edges and overall finish.
When I first started leather crafting, I remember working on a vegetable-tanned leather wallet. The firmness of the leather made it easier to achieve a smooth edge.
Common Mistakes to Avoid When Burnishing Edges
Here are a few common mistakes to avoid when burnishing leather edges:
One of the biggest mistakes you can make is starting burnishing without properly preparing the edges. Rough, uneven edges never look good, no matter how much you burnish.
While it’s important to moisten the edge, overdoing it can cause problems. Too much water or burnishing solution can make the leather swell.
Using the wrong burnishing tool can make the process harder and the results less impressive. I once used the handle of a wooden spoon. It worked okay but didn’t give me the smooth finish.
When burnishing by hand, it’s easy to think that more pressure will give you better results. However, too much pressure can damage the leather. I once pressed too hard and ended up with an uneven edge that looked worse than before.
Rushing through the steps can lead to poor results. I was making a leather wallet and rushed the burnishing because I was short on time. The edges didn’t turn out as smooth as I wanted.
Forgetting to apply burnishing agents can make the process harder and less effective.
Addressing the Common Issues
Even with the best techniques, things can go wrong. Don’t worry, though I’ve been there, and I’ve got some tips to help you handle these common issues.
1. Uneven Edges
Sometimes, despite your best efforts, you end up with uneven edges.
Go back to your prep work. Make sure the edges are cut straight and beveled evenly. If they’re not, trim and bevel them again.
2. Edge Not Getting Smooth
If your edge isn’t smoothing out, it might be because it’s too dry or you’re not applying enough pressure.
Try reapplying a bit of water, gum tragacanth, or beeswax. Gradually apply more pressure.
I had a leather bag project where the edges wouldn’t smooth out. Adding more gum tragacanth and using firmer pressure helped achieve the desired smoothness.
3. Burnishing Takes Too Long
If you find that burnishing is taking forever, it might be due to the type of leather or the tools you’re using.
Ensure you’re using a good-quality burnishing tool. Some leathers are naturally more difficult to burnish. Veg-tan leather burnishes well, while chrome-tanned can be tougher.
I worked on a leather wallet made from chrome-tanned leather and found it much harder to burnish.
4. Burnished Edge Looks Dull
If your edges look dull after burnishing, apply a thin layer of beeswax and then burnish again. This usually brings out a nice shine.
I remember a time when my burnished edges looked dull. Adding a beeswax finish and buffing with a canvas cloth made a difference.
5. Machine Burnishing Issues
If you’re using a burnishing machine and things aren’t going smoothly, check the settings and your technique.
When I first used a burnishing machine, I had the speed too high, which caused issues.
How to Care for Burnished Edges?
Caring for burnished edges on leather goods is essential to maintaining aesthetics and durability. Here’s how to care for burnished edges effectively:
Clean the edges of your leather item to remove dirt, dust, or residue. Use a damp cloth or a specialized leather cleaner to wipe the edges.
Periodically inspect the edges for signs of wear or damage and address any issues promptly. I have a leather wallet that I’ve maintained for years. Cleaning has kept it looking as good as new.
To prolong the life of the burnished edges, avoid exposing them to excessive wear and tear. Be mindful of how you use and handle your leather items to prevent unnecessary damage to the edges.
When not in use, store your leather goods in a cool, dry place away from direct sunlight and moisture. I store my leather goods in dust bags.
Source: Mark the Braider YT Channel
Conclusion
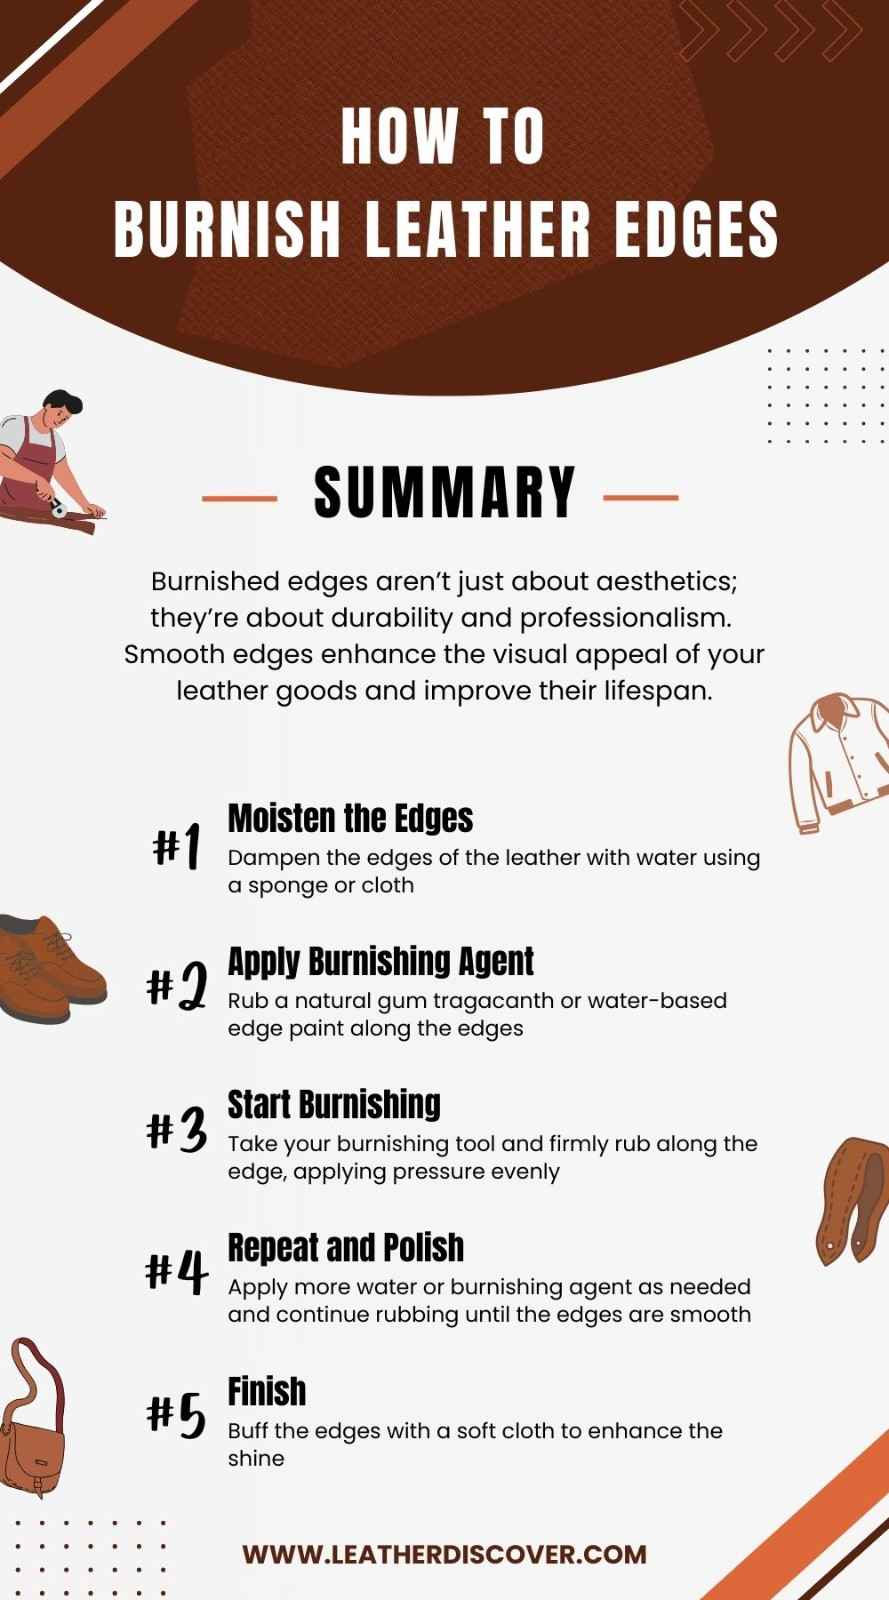
Burnished edges aren’t just about aesthetics; they’re about durability and professionalism.
Smooth edges enhance the visual appeal of your leather goods and improve their lifespan.
Whether you prefer hand burnishing or the efficiency of a motorized tool, the key is finding what works best for you and your projects.
Don’t be afraid to experiment with different burnishing agents or try decorative techniques to make your edges pop.
Remember, mastering burnishing takes practice. Don’t be discouraged by the occasional blunders.
Enjoy the process, embrace the learning journey, and soon enough, you’ll be creating leather pieces with edges that shine.
Resources Consulted

- What Is Caiman Leather? A Detailed Guide - July 25, 2024
- What Is Tumbled Leather?A Complete Guide - July 25, 2024
- What Is Kip Leather? Premium Leather Choice - July 24, 2024